")
One thing which is quite common these days is many customers moving to Public cloud or setting up their own Private Cloud. In any of the case they need to maintain & manage costing of their infrastructure. Also from business point of view it becomes utmost priority to track costing of your infrastructure.
For most of the public cloud vendors there are applications available to publish Charge back & Show back statements but it becomes really challenging for customers when they have to maintain similar kind of inventory for their in-house cloud development.
VMware positions itself in a strong place to provide this functionality to its customer where they can not only leverage their private deployment costing but also gives you a comparison fom various Public cloud (like AWS, Azure, vCloudAir) vendors for the same workload as well. The product which comes bundled with these capabilities is names as vRealize Business for Cloud (aka vRBC).
The deployment of this product is really simple and straight forward and customer gets basically three modes of deployment:
- Integrated with vRealize Identity Manager (vIDM)
- Standalone (POC ONLY installation)
- Integrated with vRealize Automation (vRA)
For lab purpose I’ll be discussing about Standalone deployment mode however the most popular mode of vRBC deployment is Integrated with vRA where vRBC gets integrated with customer’s existing vRA self-service portal and fetches data straight from the vRA appliance for charge back/show back.
Below are the ports requirements for setting up your vRBC environment which are used to collect data from various sources. Also it is highly recommended to review vRBC Installation guide for reference
| Source | Destination | Protocol | Port |
| vRBC | vRA, vCenter, vCD, vROps, SRM, AWS, vCloud Air | HTTPS | 443 |
| vRA | vRBC | SSH | 22 |
| vRBC Web console | vRBC | HTTPS | 5480 |
| vRBC for cloud mobile application | vRBC | HTTPS | 10443 |
| vRBC | vCenter Inventory Service | HTTPS | 10443 |
| Data collection manager | vRBC | HTTPS | 9443 |
So without further discussion let’s jump into the actual deployment.
It starts from deploying vRBC .ova file which can be downloaded from VMware portal. Appliance deployment is same as of for any other .ova file providing file path and necessary inputs as shown below.


Provide the storage place to store deployed appliance.
Please note that Thin provisioning is only recommended for POC environment, for production environment please refer to vRBC 7.2.0 release notes
*vRealize Business for Cloud can scale up to 20,000 virtual machines (including live and deleted) across ten VMware vCenter Server instances. The vRealize Business for Cloud server requires a minimum of 50 GB of disk space, 8 GB memory, and 4 vCPU

Provide a route-able network for the appliance

Provide password (for root user), Currency in which customer wants charge-back/show-back and enable SSH with the check box

Provide default gateway/ domain name/ DNS/ IP address and Subnet related information

View summary of the information provided which vRBC appliance will be using for deployment

Once the appliance deployed status is completed in vCenter server, power on the vm and browse to the URL https://fqdn_or_IP:5480 and login using root username and password which was provided during installation. This is the landing page for managing vRBC appliance and to integrate it with vIDM or vRA (discussed above in modes of deployment)

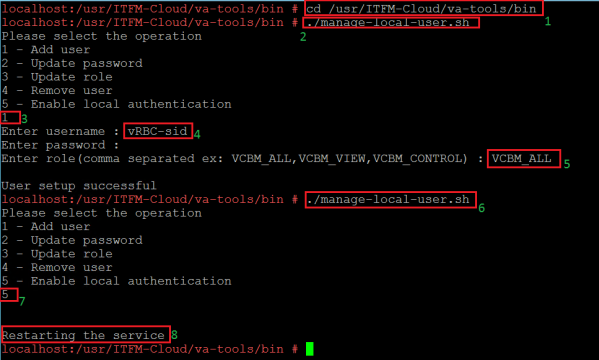
Since for this lab setup we will be using standalone mode of deployment hence SSH to vRBC vm and follow the setps as below:
- Browse to the directory /usr/ITFM-Cloud/va-tools/bin
- Run command ./manage-local-user.sh
- Press 1 and hit enter to Add User
- Provide username (vRBC-sid in my case) and Password
- Type VCBM_ALL to promote role to the newly created user
- Again run command ./manage-local-user.sh
- Type 5 and hit enter to enable authentication and activate the user
- Wait for Restarting the service message to appear
Once user creation is completed then logout of the SSH console and browse to the URL https:/fqdn_or_IP and vRBC web console will be available. Login with the newly created user and password. Here customer need to provide License key to access vRBC features.
*If customer have vCloud suit license then same key can be applied to license vRBC as well
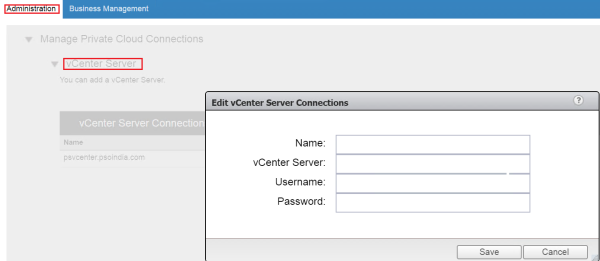
Now we need to attach vCenter server with vRBC to fetch charge-back/show-back data. In order to do so click on Administration tab and select vCenter Server – provide necessary vCenter information so that vRBC appliance can connect
Tip: For standalone mode please SSH to vRBC vm and edit hostname file (vi /etc/hosts) and provide vCenter fqdn & IP address for resolution
Under Administration tab is the link for Update Reference Database – this is the location which customer can use to setup their costing mechanism. Customer can either opt for Automatic Update for costing and if the vRBC appliance is behind firewall then they select Manual Update Process by which they can download offline costing bundle and link it to vRBC database.

Once costing database is selected click on Update Now to refresh Cost Collection and vCenter data collection and wait for Status to turn green.
It may take several minutes to update vCenter data collection to turn green depending upon vCenter server inventory

Once the connections are established then under Overview page vCenter inventory can be seen along-with its costing. Also under Operational Analysis – Private Cloud (vSphere) charge-back/show-back statement of its various components can be viewed
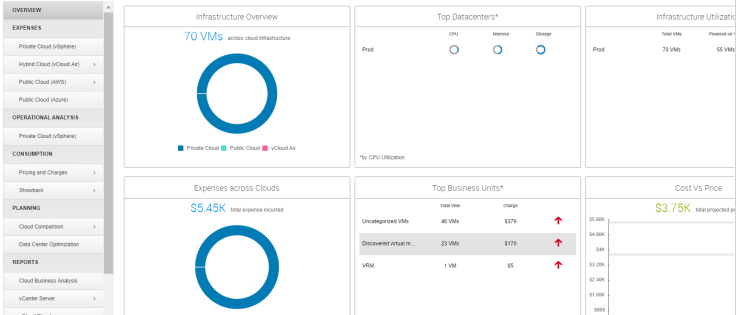

Under Planning – Cloud Comparison – Compare existing VMs across cloud tab customer can view the costing comparison of same workload across various public clouds. They have the option to select VM sample sizing to view any new workload to be deployed across various public clouds VS private cloud cost.

These are few of the various options available in vRBC for customer to leverage charge-back/show-back mechanism. So it is highly recommended to deploy vRBC in your environment and start exploring the opportunities comes bundled along with this product.
With the emerging era of cloud deployment it is really necessary to keep track of its costing because this is what cloud model is all about PAY AS YOU USE
With this I end this blog… I hope it helps…. till then Happy Reading 🙂

")


Leave a comment